KeepInTouch Developer Guide
KeepInTouch is a desktop app for managing contacts for job-seekers. It can also help job-seekers to manage events for career purposes.
Table of Contents
- Table of Contents
- Acknowledgements
- Setting up and getting started
- Design
- Implementation
- Documentation, logging, testing, configuration, dev-ops
- Appendix A: Requirements
- Appendix B: Instructions for manual testing
- Appendix C: Planned enhancements
Acknowledgements
This project is based on the AddressBook Level-3 project.
Libraries used: JavaFX, Jackson, JUnit5
https://github.com/rrice/java-string-similarity. Reused the sourcecode of this library to measure string similarity for the help command.
Setting up and getting started
Refer to the guide Setting up and getting started.
Design
Architecture

The Architecture Diagram given above explains the high-level design of the App.
Given below is a quick overview of main components and how they interact with each other.
Main components of the architecture
Main (consisting of classes Main and MainApp) is in charge of the app launch and shut down.
- At app launch, it initializes the other components in the correct sequence, and connects them up with each other.
- At shut down, it shuts down the other components and invokes cleanup methods where necessary.
The bulk of the app's work is done by the following four components:
UI: The UI of the App.Logic: The command executor.Model: Holds the data of the App in memory.Storage: Reads data from, and writes data to, the hard disk.
Commons represents a collection of classes used by multiple other components.
How the architecture components interact with each other
The Sequence Diagram below shows how the components interact with each other for the scenario where the user issues the command delete contact 1.

Each of the four main components (also shown in the diagram above),
- defines its API in an
interfacewith the same name as the Component. - implements its functionality using a concrete
{Component Name}Managerclass (which follows the corresponding APIinterfacementioned in the previous point).
For example, the Logic component defines its API in the Logic.java interface and implements its functionality using the LogicManager.java class which follows the Logic interface. Other components interact with a given component through its interface rather than the concrete class (reason: to prevent outside component's being coupled to the implementation of a component), as illustrated in the (partial) class diagram below.

The sections below give more details of each component.
UI Component
The API of this component is specified in Ui.java

The UI consists of a MainWindow that is made up of parts e.g.CommandBox, ResultDisplay, PersonListPanel, StatusBarFooter, etc. All these, including the MainWindow, inherit from the abstract UiPart class which captures the commonalities between classes that represent parts of the visible GUI.
The UI component uses the JavaFx UI framework. The layout of these UI parts are defined in matching .fxml files that are in the src/main/resources/view folder. For example, the layout of the MainWindow is specified in MainWindow.fxml
The UI component,
- executes user commands using the
Logiccomponent. - listens for changes to
Modeldata so that the UI can be updated with the modified data. - keeps a reference to the
Logiccomponent, because theUIrelies on theLogicto execute commands. - depends on some classes in the
Modelcomponent, as it displaysPersonobject residing in theModel.
Logic Component
API : Logic.java
Here's a (partial) class diagram of the Logic component:

The sequence diagram below illustrates the interactions within the Logic component, taking execute("find John") API call as an example.
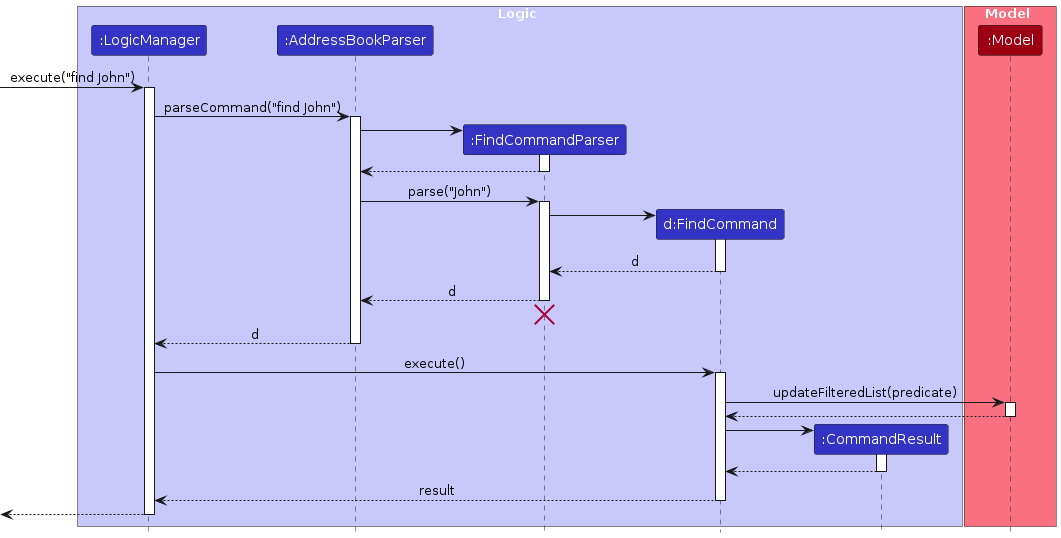
Note: The lifeline for FindCommandParser should end at the destroy marker (X) but due to a limitation of PlantUML, the lifeline reaches the end of diagram.
How the Logic component works:
- When
Logicis called upon to execute a command, it is passed to anAddressBookParserobject which in turn creates a parser that matches the command (e.g.,FindCommandParser) and uses it to parse the command. - This results in a
Commandobject (more precisely, an object of one of its subclasses e.g.,FindCommand) which is executed by theLogicManager. - The command can communicate with the
Modelwhen it is executed (e.g. to delete a person). - The result of the command execution is encapsulated as a
CommandResultobject which is returned back fromLogic.
Here are the other classes in Logic (omitted from the class diagram above) that are used for parsing a user command:

How the parsing works:
When called upon to parse a user command, the
AddressBookParserclass creates anXYZCommandParser(XYZis a placeholder for the specific command name e.g.,AddCommandParser) which uses the other classes shown above to parse the user command and create aXYZCommandobject (e.g.,AddCommand) which theAddressBookParserreturns back as aCommandobject.All
XYZCommandParserclasses (e.g.,AddCommandParser,DeleteCommandParser, ...) inherit from theParserinterface so that they can be treated similarly where possible e.g, during testing.Some commands contain secondary command, like
add contact,add noteandadd event.- In this case, the primary command parser (in the example it is
AddCommand) will check the secondary command word and use the correspond secondary command parser (likeAddPersonCommandParser,AddEventCommandParserandAddNoteCommandParser) to continue parsing the command.
- In this case, the primary command parser (in the example it is
The parser will turn the arguments in the command from raw
Stringinto corresponding Object. During this process, the parser also needs to check whether the arguments are valid or not.- The parsing method for each types of arguments are mainly in
ParserUtil.java
- The parsing method for each types of arguments are mainly in
If the command is correct in format, the parser will then return a Command Object for the execution of the command.
Model Component
API : Model.java

The Model component,
- stores the address book data i.e., all
Personobjects (which are contained in aUniquePersonListobject) and allEventobjects (which are contained in aUniquePersonListobject). - stores the currently 'selected'
PersonandEventobjects (e.g., results of a search query) as a separate filtered list which is exposed to outsiders as an unmodifiableObservableList<Person>andObservableList<Event>, respectively, that can be 'observed' e.g. the UI can be bound to this list so that the UI automatically updates when the data in the list change. - stores a
UserPrefobject that represents the user’s preferences. This is exposed to the outside as aReadOnlyUserPrefobjects. - does not depend on any of the other three components (as the
Modelrepresents data entities of the domain, they should make sense on their own without depending on other components)
Storage Component
API : Storage.java

The Storage component,
- can save both address book data and user preference data in JSON format, and read them back into corresponding objects.
- inherits from both
AddressBookStorageandUserPrefStorage, which means it can be treated as either one (if only the functionality of only one is needed). - depends on some classes in the
Modelcomponent such asPerson,Note, andEventbecause theStoragecomponent's job is to save/retrieve objects that belong to theModel.
Common Classes
Classes used by multiple components are in the seedu.addressbook.commons package.
Implementation
This section describes some noteworthy details on how certain features are implemented.
List Contact with Tags feature
This feature allows users to filter the contact list by tags. It serves as an effective way to search through a long list of contacts.
The filtered contact list will then be reflected in the UI, which is facilitated by the Model interface through this following operation:
Model#updateFilteredPlanList(Predicate)- Filters the contact list based on the predicate input.
The execution of the list command starts with parsing the arguments using ListCommandParser and ListPersonCommandParser
, which then the ListContactCommand result will be executed and reflected in the UI.
Implementing ListPersonCommandParser
Using the Parser interface, it first checks for tags in the command.
These tags will then be parsed into a Set and passed on to create ListPersonCommand object.
An empty set will be passed in the case where no tags are given.
Implementing ListPersonCommand
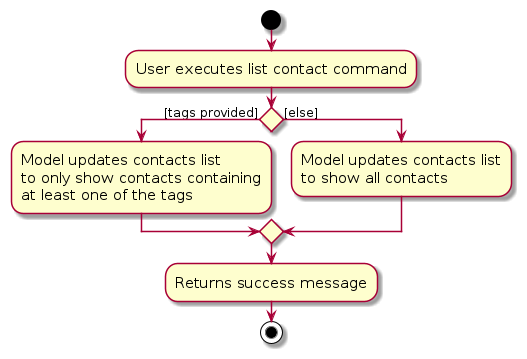
From the Set<tag> passed to construct the ListPersonCommand object, the Set can be empty or non-empty.
This is how the execute method is implemented:
In the case where the
Setis empty, it will simply useModel#updateFilteredPlanList(Predicate)where the predicate will bePREDICATE_SHOW_ALL_PERSONSwhich will show the entire contact list.In the case where the
Setis not empty (there are tag inputs), thePredicateused inModel#updateFilteredPlanList(Predicate)will be checking whether one of the tags in the contact is in theSet. This will result in showing only the contacts with at least one of the tags from theSet.
Given below is an example usage scenario and how the list contact command mechanism behaves at each step.
Step 1. The user launches the application, it will show the list of all contacts.
Step 2. The user executes list contact -t friends command
to list only the contacts containing the tag friends.
As described by the above implementations, a ListPersonCommand object will be created.
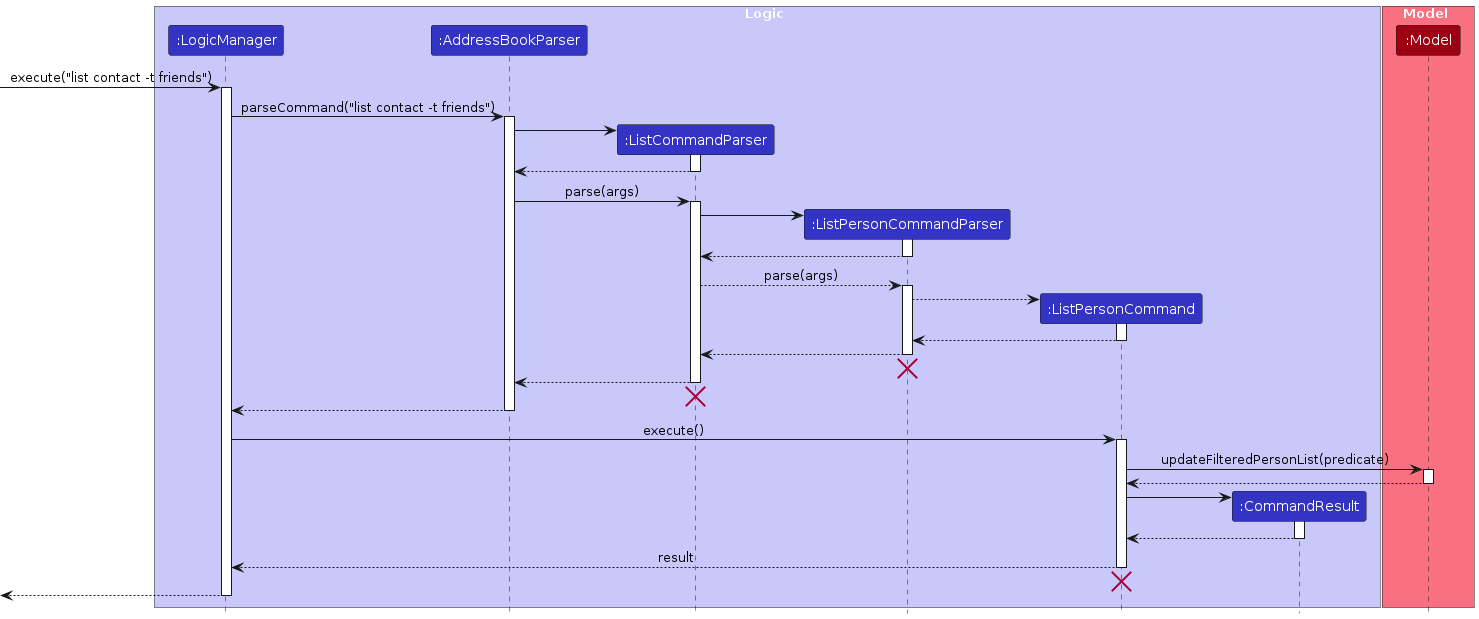
Step 3. The LogicManager will call ListPersonCommand#execute
where it will then call Model#updateFilteredPlanList(Predicate) and return the CommandResult.
Step 4. The filtered list and success message will be reflected in the UI.
The following sequence diagram shows how the list contact command works:
The following activity diagram shows how the list contact command works:
Tag feature
This feature allows users to add and remove Tag to any Person in the contact list. It provides an easy way for users to catrgorize their contacts.
Overview: Tag
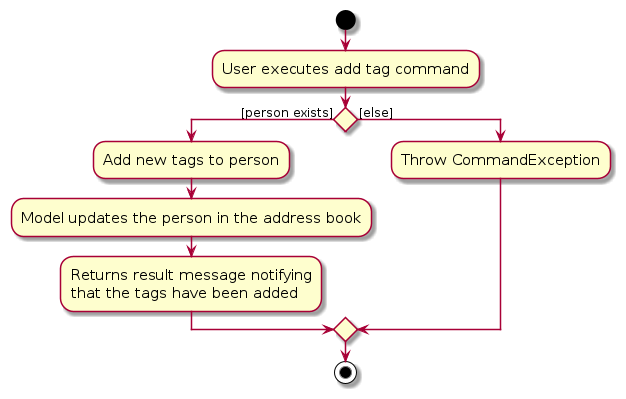
The adding and removing of Tag begins with the parsing of the AddTagCommand and DeleteTagCommand using the AddTagCommandParser and DeleteTagCommandparser respectively. The AddTagCommand and DeleteTagCommand will then be executed by the Model.
The activity diagram below shows the action sequence of adding one or more Tag to a contact.
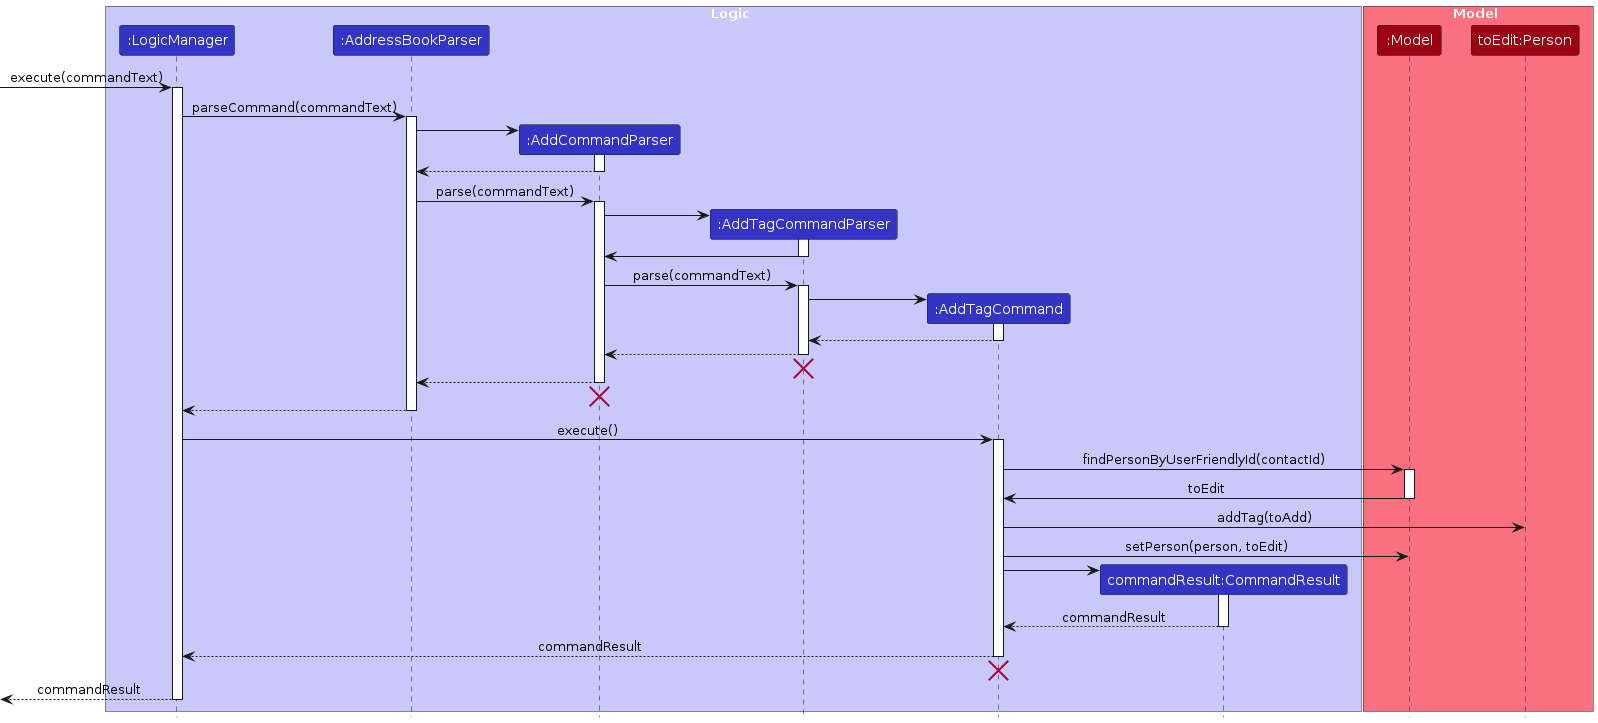
Note: The sequence diagram for removing Tag is similar to adding Tag. Simply replace AddCommandParser with DeleteCommandParser, AddTagCommandParser with DeleteTagCommandParser, and AddTagCommand with DeleteTagCommand, etc.
Implementing AddTagCommandParser and DeleteTagCommandParser
Both implements the Parser interface, parsing two main arguments:
contactId: the one-based index of the contact shown in the GUI.taglist: the unique set ofTagto add/delete.- The set of tags is parsed using the
parseTagsmethod in theParseUtilutility class, which puts the collection of tag names given by the user into aHashSet.
- The set of tags is parsed using the
contactId and taglist is then use to create the AddTagCommand/DeleteTagCommand object.
For the details of how parsing works, see the section on Logic Component.
Implementing AddTagCommand
AddTagCommand extends from the abstract class AddCommand, inheriting add as the primary command word and having tag as its secondary command word. It internally stores contactId (the index of the contact) and toAdd (the set Tag to add) which is given by the parser.
When the command is execute, it carries out the following operations:
Using the
contactId, it will first check if thepersonexist in the address book by callingModel'sfindPersonByUserFriendlyIdmethod.- A
CommandExceptionis thrown if the person does not exist.
- A
The set of tags is then added to the person's tag list by calling the
addTagsmethod inPerson.The
Model'ssetPersonmethod is used to update the person.Lastly a
CommandResultwith the success message is returned.
The following activity diagram summarizes what happens when AddTagCommand is executed:
Implementing DeleteTagCommand
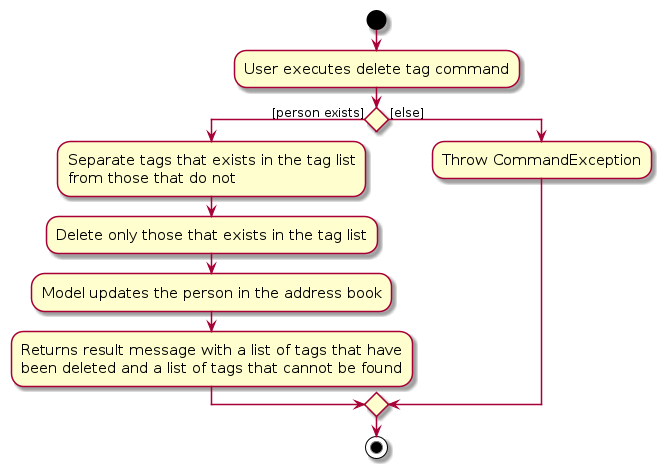
DeleteTagCommand extends from the abstract class DeleteCommand, inheriting delete as the primary command word and having tag as its secondary command word. It internally stores contactId (the index of the contact) and toDelete (the set Tag to delete) which is given by the parser.
When the command is execute, it carries out the following operations:
Using the
contactId, it will first check if thepersonexist in the address book by callingModel'sfindPersonByUserFriendlyIdmethod.- A
CommandExceptionis thrown if the person does not exist.
- A
Loop through every
Tagthat the person has, separating those that be found intoDeleteand those not found.The set of tags found in
toDeleteis then deleted from the person's tag list by calling theremoveTagsmethod inPerson.The
Model'ssetPersonmethod is used to update the person.Lastly a
CommandResultwith the success message is returned.
The following activity diagram summarizes what happens when the DeleteTagCommand is executed:
Design Considerations: Tag
Aspect: Deletion of non-existing tag:
Alternative 1: Ignore and proceed as normal.
- Pros: Easy to implement. Furthermore, since outcome of proceeding and not proceeding is the same, there will not be a severe consequence of proceeding.
- Cons: Does not reflect true behavior, and users may be confused by success message.
Alternative 2: Does not proceed.
- Pros: Users will be made aware of their mistake and prevents executing potentially wrong commands.
- Cons: If the command was intentional, time is wasted for user to correct their command.
Alternative 3 (current choice): Proceed but inform user that some tags are non-existing.
- Pros: Users will be made aware of their mistake. Does not waste time on correcting the command if the command was intentional.
- Cons: Harder to implement.
Notes feature
This feature allows users to add and remove Note to any Person in the contact list. It provides an easy way for users to record additional information about the contacts.
Overview: Note
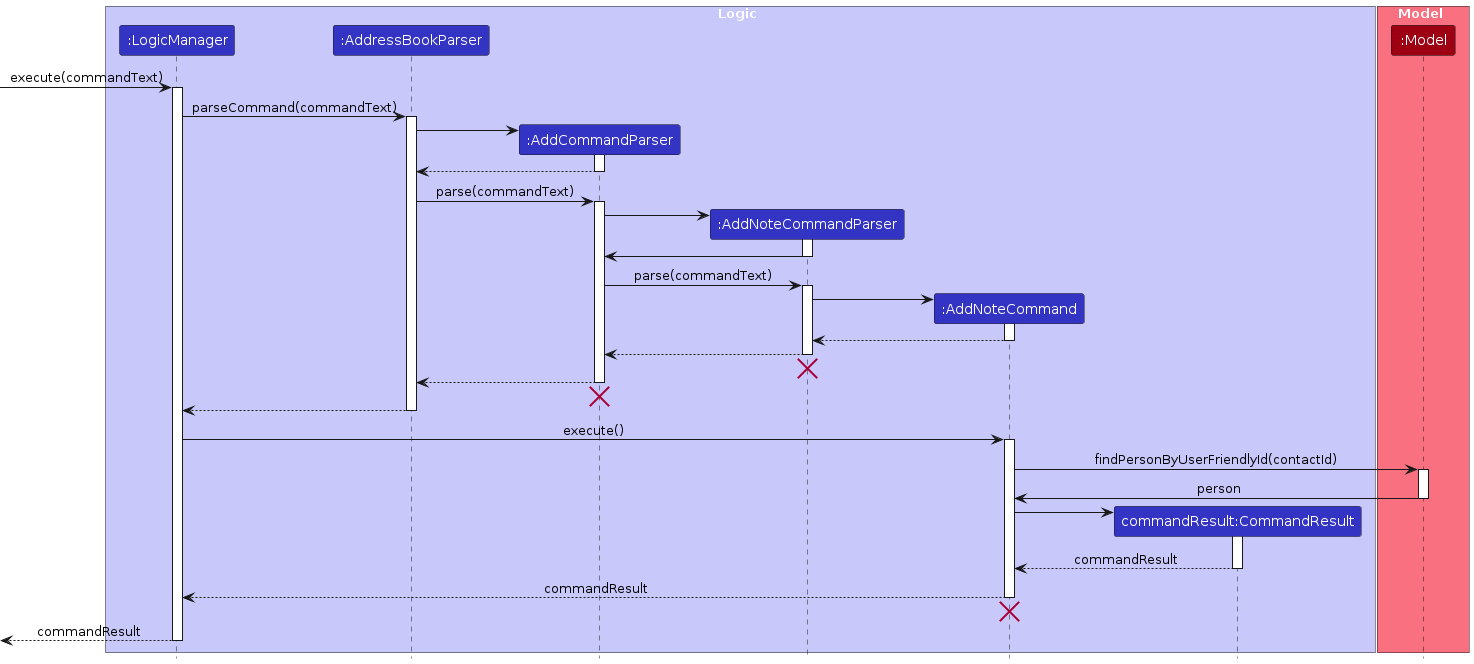
The adding and removing of Note begins with the parsing of the AddNoteCommand and DeleteNoteCommand using the AddNoteCommandParser and DeleteNoteCommandParser respectively. The AddNoteCommand and DeleteNoteCommand will then be executed by the Model.
The activity diagram below shows the action sequence of adding a Note to a contact.
Implementing AddNoteCommandParser
Implements the Parser interface, parsing three main arguments:
contactId: the one-based index of the contact shown in the GUI.noteTitle: the title of the note to add.noteContent: the content of the note to add.
noteTitle and noteContent are then used to create the Note object. After that, contactId and the Note object created are then used to create the AddNoteCommand object.
For the details of how parsing works, see the section on Logic Component.
Implementing DeleteNoteCommandParser
Implements the Parser interface, parsing two main arguments:
contactId: the one-based index of the contact shown in the GUI.noteId: the one-based index of the note shown in the GUI.
contactId and noteId are then used to create the DeleteNoteCommand object.
For the details of how parsing works, see the section on Logic Component.
Implementing AddNoteCommand
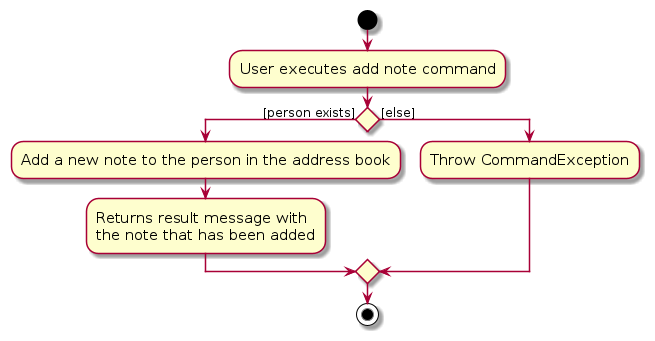
AddNoteCommand extends from the abstract class AddCommand, inheriting add as the primary command word and having note as its secondary command word. It internally stores contactId (the index of the contact) and toAdd (the Note to add) which is given by the parser.
When the command is executed, it carries out the following operations:
Using the
contactId, it will first check if thepersonexist in the address book by callingModel'sfindPersonByUserFriendlyIdmethod.- A
CommandExceptionis thrown if the person does not exist.
- A
The note is then added to the person's note list by calling the
addNotemethod inPerson.Lastly a
CommandResultwith the success message is returned.
The following activity diagram summarizes what happens when AddNoteCommand is executed:
Implementing DeleteNoteCommand
DeleteNoteCommand extends from the abstract class DeleteCommand, inheriting delete as the primary command word and having note as its secondary command word. It internally stores contactId (the index of the contact) and noteIdToDelete (the Note to delete) which is given by the parser.
When the command is executed, it carries out the following operations:
Using the
contactId, it will first check if thepersonexist in the address book by callingModel'sfindPersonByUserFriendlyIdmethod.- A
CommandExceptionis thrown if the person does not exist.
- A
Using the
noteIdToDelete, it will delete the note from the person in the address book by callingPerson'sremoveNoteByUserFriendlyIdmethod.- A
CommandExceptionis thrown if the note does not exist.
- A
Lastly a
CommandResultwith the success message is returned.
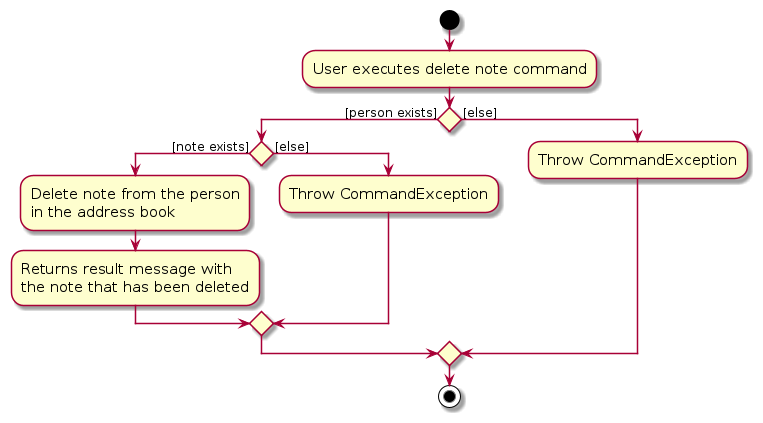
The following activity diagram summarizes what happens when the DeleteNoteCommand is executed:
Events feature
This feature allows users to add and remove Event to any Person in the contact list. It provides an easy way for users to keep track of events with the contacts.
Overview: Event:
The adding, listing and removing of Event begins with the parsing of the AddEventCommand, ListEventCommand and DeleteEventCommand using the AddEventCommandParser, ListEventCommandParser and DeleteEventCommandParser respectively.
The AddEventCommand, ListEventCommand and DeleteEventCommand will then be constructed and executed by the Model.
The activity diagram below shows the action sequence of adding an Event to a contact.
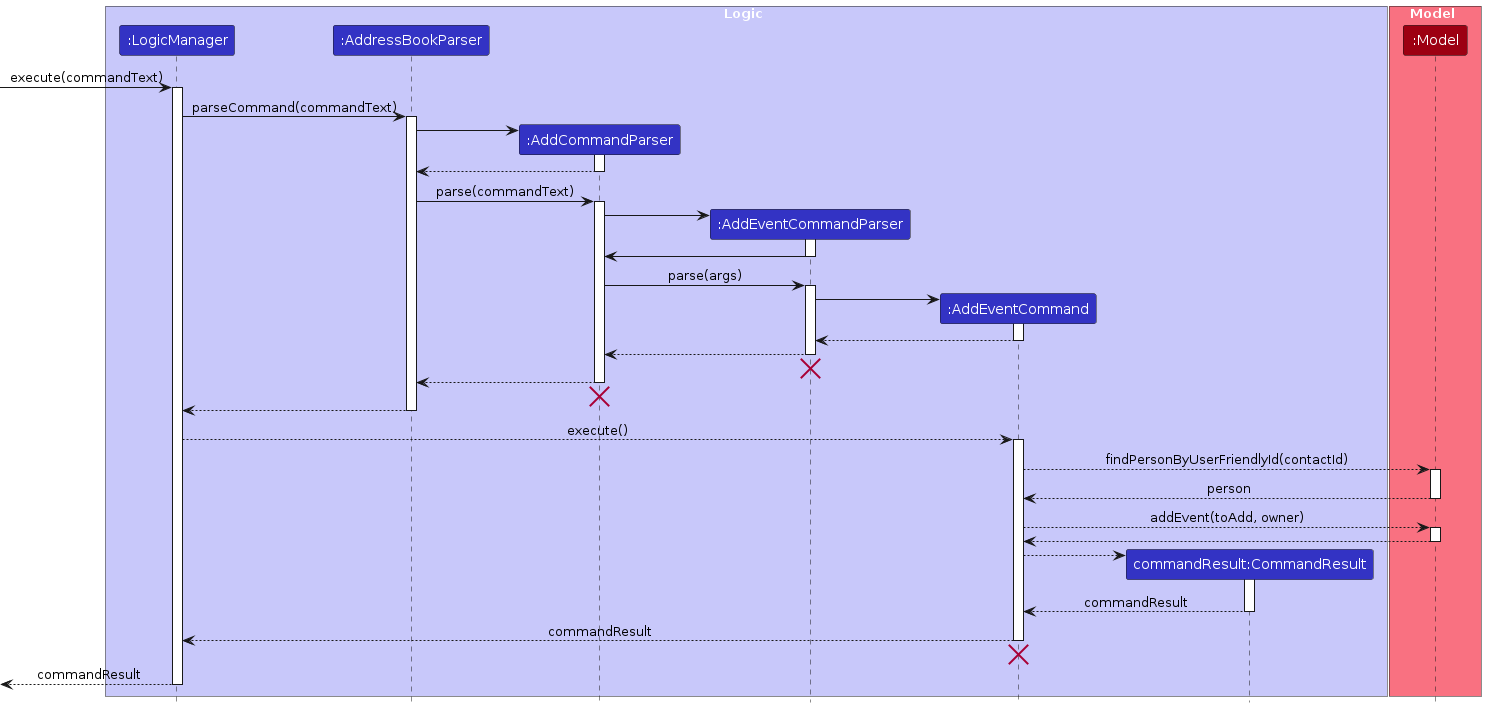
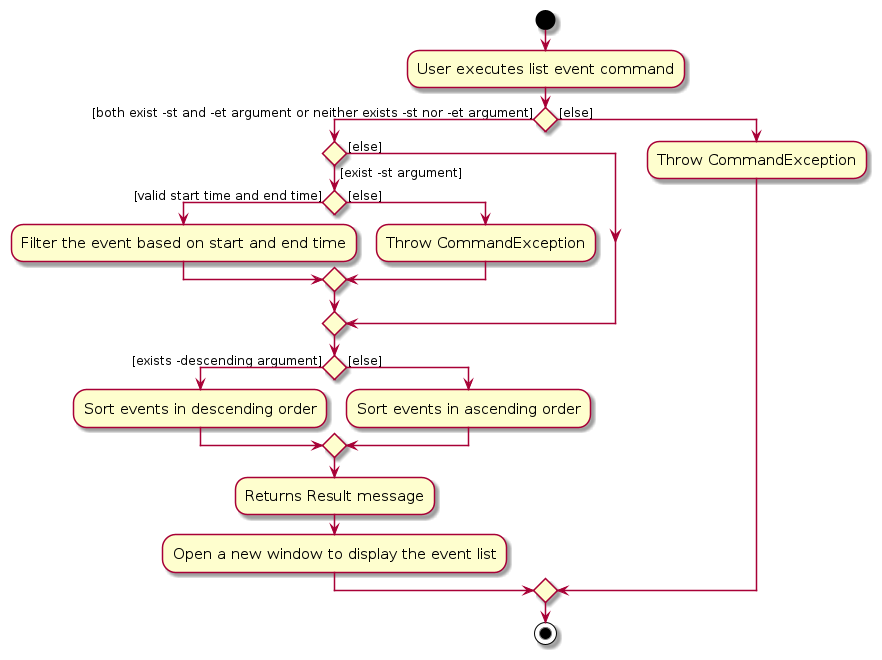
The activity diagram below shows the action sequence of listing events by executing list events command.
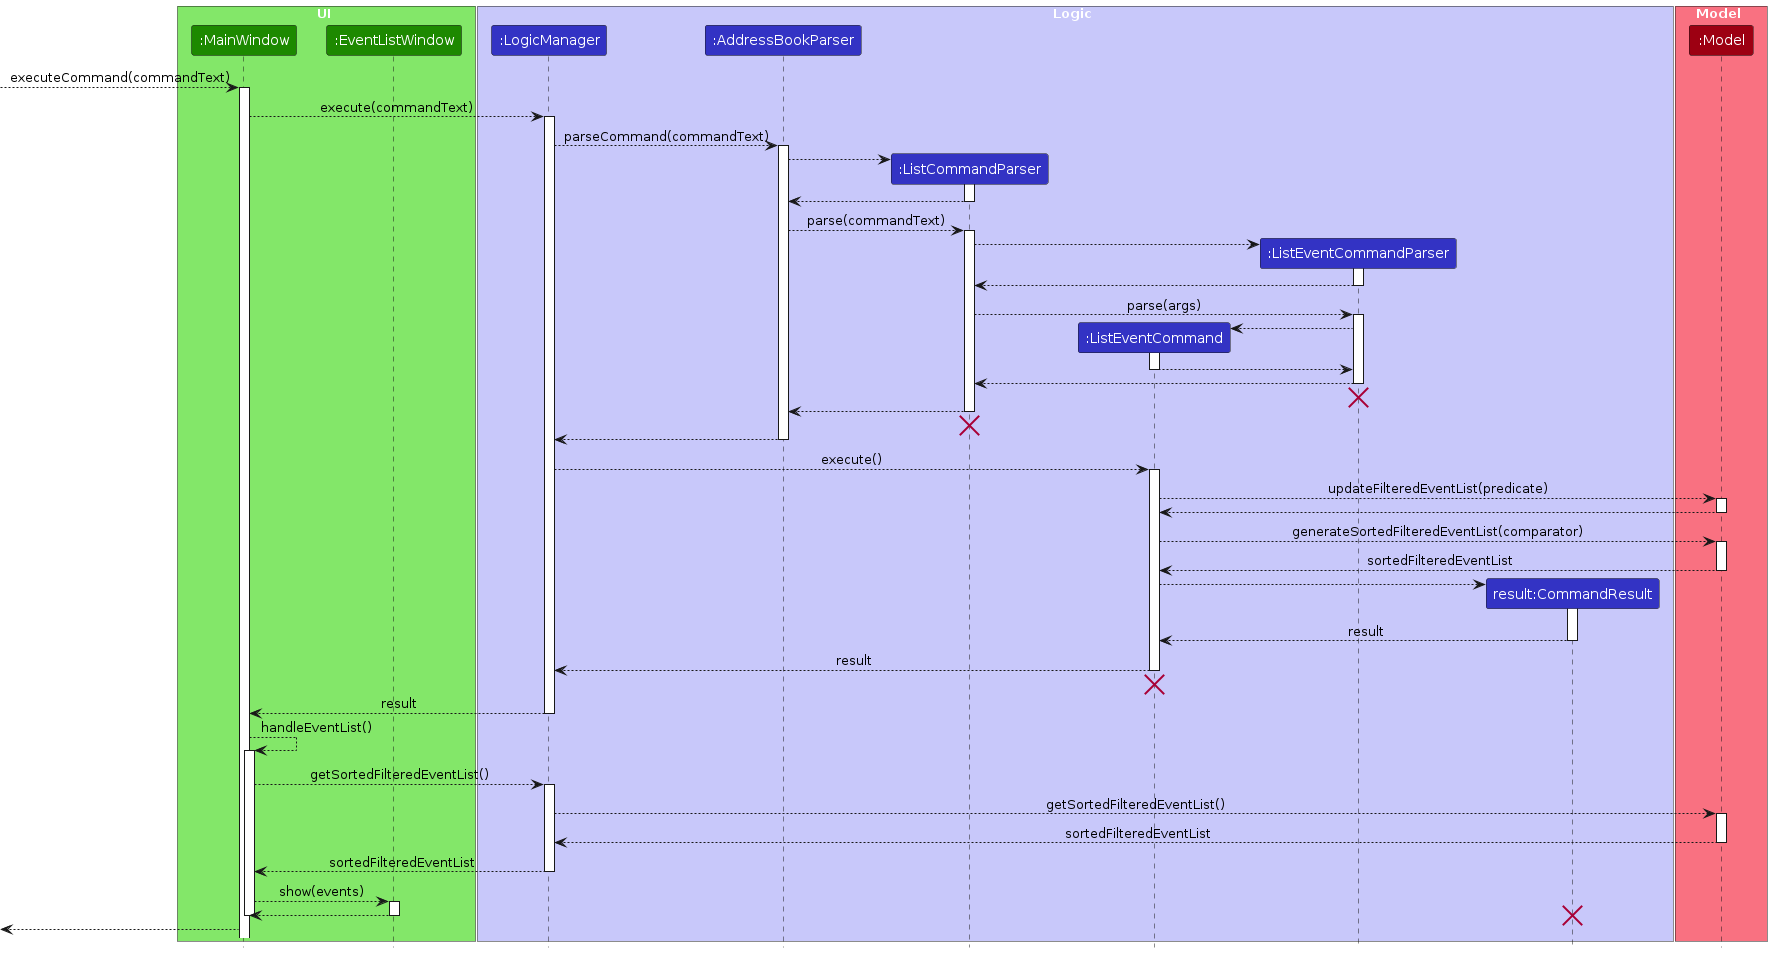
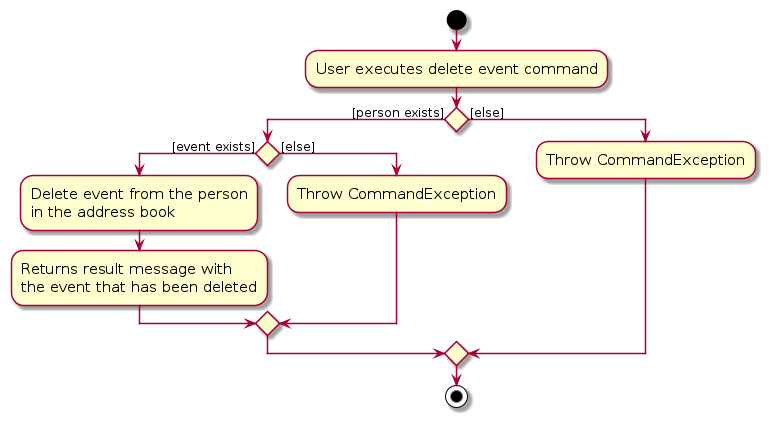
The activity diagram below shows the action sequence of deleting an event by contact ID and event ID.
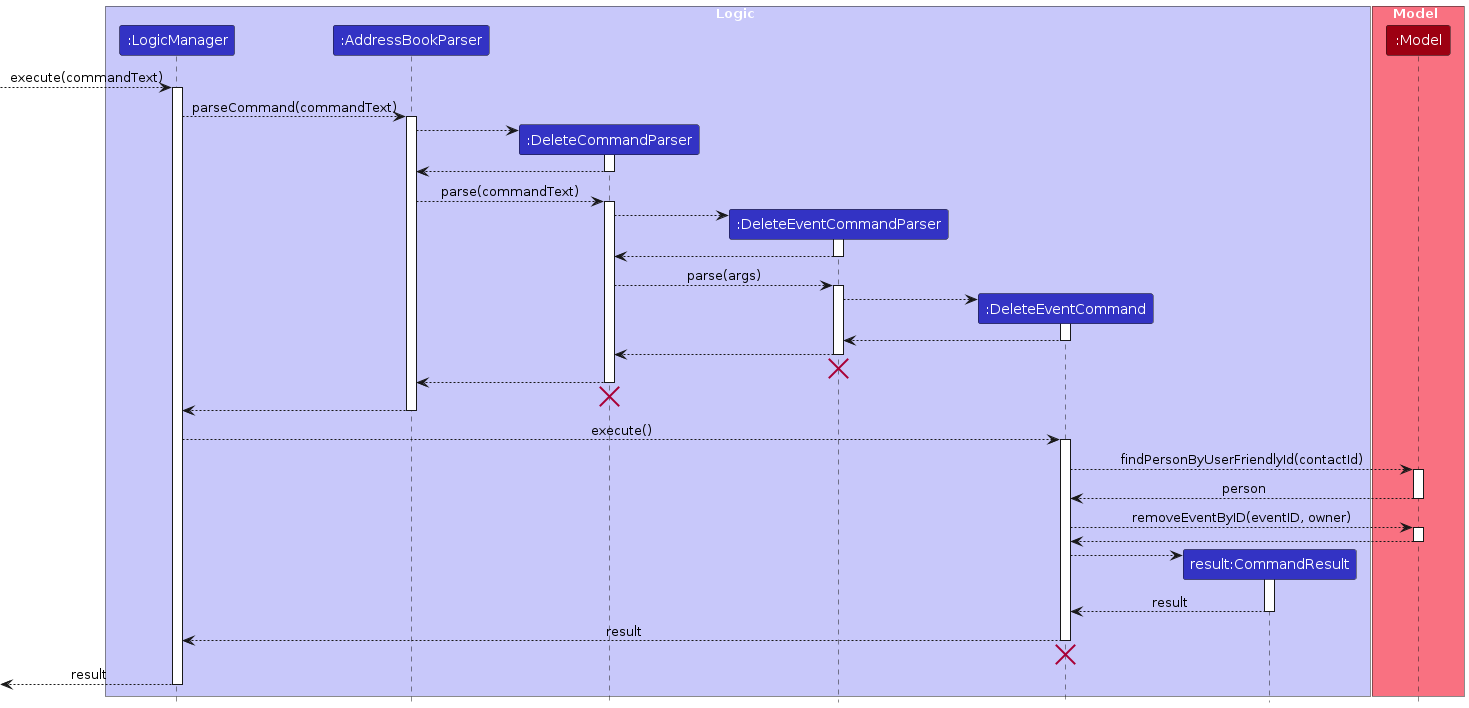
Note:
The sequence diagram for deleting Event is similar to adding Event.
Simply replace AddCommandParser with DeleteCommandParser, AddEventCommandParser with DeleteEventCommandParser, and AddEventCommand with DeleteEventCommand.
Implementing AddEventCommandParser
Implements the Parser interface, parsing six main arguments:
contactId: the one-based index of the contact shown in the GUI.eventName: the name of the event.eventStartTime: the start time of the event.eventEndTime: the end time of the event.eventLocation: the location of where the event will be held.eventInformation: the description of the event.
eventName, eventStartTime, eventEndTime, eventLocation, and eventInformationare then used to create the Event object.
After that, contactId and the Event object created are then used to create the AddEventCommand object.
For the details of how parsing works, see the section on Logic Component.
Implementing ListEventCommandParser
Implements the Parser interface, parsing three main arguments:
filterStartTime: the start time for filtering the eventsfilterEndTime: the end time for filtering the eventsuseAscendingOrder: should use ascending order when sorting the events?
filterStartTime, filterEndTime and useAscendingOrder are then used to create the ListEventCommand object.
filterStartTime and filterEndTime can both be null (to disable filtering) or neither be null, but can NOT only one of them be null.
For the details of how parsing works, see the section on Logic Component.
Implementing DeleteEventCommandParser
Implements the Parser interface, parsing two main arguments:
contactId: the one-based index of the contact shown in the GUI.eventId: the one-based index of the event shown in the GUI.
contactId and eventId are then used to create the DeleteEventCommand object.
For the details of how parsing works, see the section on Logic Component.
Implementing AddEventCommand
AddEventCommand extends from the abstract class AddCommand,
inheriting add as the primary command word and having event as its secondary command word.
It internally stores contactId (the index of the contact) and toAdd (the Event to add) which is given by the parser.
When the command is executed, it carries out the following operations:
Using the
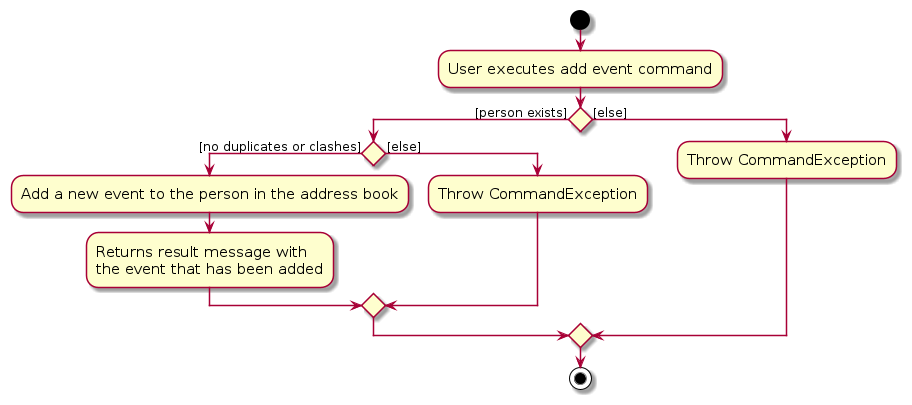
contactId, it will first check if thePersonexist in the address book by callingModel'sfindPersonByUserFriendlyIdmethod.- A
CommandExceptionis thrown if the person does not exist.
- A
The
Eventis then added to the person's note list by calling theaddEventmethod inPerson.Lastly a
CommandResultwith the success message is returned.
The following activity diagram summarizes what happens when AddEventCommand is executed:
Implementing ListEventCommand
ListEventCommand extends from the abstract class ListCommand,
inheriting list as the primary command word and having events as its secondary command word.
It internally stores filterStartTime, filterEndTime (both can be null if filtering is not used) and sortAscending which are given by the parser.
When the command is executed, it carries out the following operations:
- Using the
filterStartTimeandfilterEndTimeto filter all events in the global event list, or set the filter to always returnstrueif bothfilterStartTimeandfilterEndTimeis null (in order to show the full event list to the user) - Sort the filtered event list in ascending or descending order based on
sortAscending - Lastly a
CommandResultwith the filtered-sorted event list in String and withlistEvent = trueto tellMainWindowto show the event list window.
The following activity diagram summarizes what happens when user executes list events from UI.
Implementing DeleteEventCommand
DeleteEventCommand extends from the abstract class DeleteCommand,
inheriting delete as the primary command word and having event as its secondary command word.
It internally stores contactId (the index of the contact) and eventIdToDelete (the Event to delete) which is given by the parser.
When the command is executed, it carries out the following operations:
Using the
contactId, it will first check if thePersonexist in the address book by callingModel'sfindPersonByUserFriendlyIdmethod.- A
CommandExceptionis thrown if the person does not exist.
- A
Using the
eventIdToDelete, it will delete the event from the person in the address book by callingPerson'sremoveEventByUserFriendlyIdmethod.- A
CommandExceptionis thrown if the event does not exist.
- A
Lastly a
CommandResultwith the success message is returned.
The following activity diagram summarizes what happens when the DeleteEventCommand is executed:
Enhanced help feature
Rationale
Previous help feature simply opens a page with a link to the website, this is bad because:
- The flow is lengthy
- User may not be able to access website when operating without the internet
Therefore, we want to make this better by simplifying the flow. We do this by adding:
- Making the help command return things in the application console
- Letting users enter an extra argument to specify what command they need guiding
- Give suggestions to users in case of a mistake in the extra argument, i.e. typo
Implementation details
Since the previous help feature needs to let the UI know that it wants to open the help window, this requires the CommandResult to have a special boolean attribute for capturing this event. We don't need this anymore, and thus we can perform a refactor to get rid of this attribute.
Since we want to directly display the help message to the user, we can use the DisplayResult UI component to show the message. It is convenient that every Command subclasses already has the MESSAGE_USAGE string attribute to indicate how the command should be used. Therefore, we can just directly fetch this from the Command subclasses if the extra argument the user inputs is valid.
Finally, we want to give suggestions if the user makes a typo. To do this, we must first be able to recognize if a user-made input is similar to a valid command word. To do this, we can utilise one of the many coefficients out there that can measure the degree of similarity between two strings, For this particular implementation, we will go with the Sorensen-Dice coefficient. The idea is to check if the maximum degree of similarity between the input and each one of the command words exceeds a certain threshold and, if so, suggest to the user what inputs they need to make. Otherwise, the ResultDisplay will just give out an error that the input is unrecognizable.
[Proposed] Undo/redo feature
Proposed Implementation
The proposed undo/redo mechanism is facilitated by VersionedAddressBook. It extends AddressBook with an undo/redo history, stored internally as an addressBookStateList and currentStatePointer. Additionally, it implements the following operations:
VersionedAddressBook#commit()— Saves the current address book state in its history.VersionedAddressBook#undo()— Restores the previous address book state from its history.VersionedAddressBook#redo()— Restores a previously undone address book state from its history.
These operations are exposed in the Model interface as Model#commitAddressBook(), Model#undoAddressBook() and Model#redoAddressBook() respectively.
Given below is an example usage scenario and how the undo/redo mechanism behaves at each step.
Step 1. The user launches the application for the first time. The VersionedAddressBook will be initialized with the initial address book state, and the currentStatePointer pointing to that single address book state.

Step 2. The user executes delete 5 command to delete the 5th person in the address book. The delete command calls Model#commitAddressBook(), causing the modified state of the address book after the delete 5 command executes to be saved in the addressBookStateList, and the currentStatePointer is shifted to the newly inserted address book state.

Step 3. The user executes add n/David … to add a new person. The add command also calls Model#commitAddressBook(), causing another modified address book state to be saved into the addressBookStateList.

Note: If a command fails its execution, it will not call Model#commitAddressBook(), so the address book state will not be saved into the addressBookStateList.
Step 4. The user now decides that adding the person was a mistake, and decides to undo that action by executing the undo command. The undo command will call Model#undoAddressBook(), which will shift the currentStatePointer once to the left, pointing it to the previous address book state, and restores the address book to that state.

Note: If the currentStatePointer is at index 0, pointing to the initial AddressBook state, then there are no previous AddressBook states to restore. The undo command uses Model#canUndoAddressBook() to check if this is the case. If so, it will return an error to the user rather
than attempting to perform the undo.
The following sequence diagram shows how the undo operation works:

Note: The lifeline for UndoCommand should end at the destroy marker (X) but due to a limitation of PlantUML, the lifeline reaches the end of diagram.
The redo command does the opposite — it calls Model#redoAddressBook(), which shifts the currentStatePointer once to the right, pointing to the previously undone state, and restores the address book to that state.
Note: If the currentStatePointer is at index addressBookStateList.size() - 1, pointing to the latest address book state, then there are no undone AddressBook states to restore. The redo command uses Model#canRedoAddressBook() to check if this is the case. If so, it will return an error to the user rather than attempting to perform the redo.
Step 5. The user then decides to execute the command list. Commands that do not modify the address book, such as list, will usually not call Model#commitAddressBook(), Model#undoAddressBook() or Model#redoAddressBook(). Thus, the addressBookStateList remains unchanged.

Step 6. The user executes clear, which calls Model#commitAddressBook(). Since the currentStatePointer is not pointing at the end of the addressBookStateList, all address book states after the currentStatePointer will be purged. Reason: It no longer makes sense to redo the add n/David … command. This is the behavior that most modern desktop applications follow.

The following activity diagram summarizes what happens when a user executes a new command:

Design considerations: Undo/redo
Aspect: How undo & redo executes:
Alternative 1 (current choice): Saves the entire address book.
- Pros: Easy to implement.
- Cons: May have performance issues in terms of memory usage.
Alternative 2: Individual command knows how to undo/redo by itself.
- Pros: Will use less memory (e.g. for
delete, just save the person being deleted). - Cons: We must ensure that the implementation of each individual command are correct.
- Pros: Will use less memory (e.g. for
Documentation, logging, testing, configuration, dev-ops
Appendix A: Requirements
Product Scope
Target user profile:
- is seeking and applying to many jobs
- has the habit of taking many notes
- prefer desktop apps over other types
- can type fast
- prefers typing to mouse interactions
- is reasonably comfortable using CLI apps
Value proposition: manage information regarding many job offers in a organised and uncluttered manner for users who is comfortable with CLI apps.
User Stories
Priorities: High (must have) - * * *, Medium (nice to have) - * *, Low (unlikely to have) - *
| Priority | As a … | I want to … | So that I can… |
|---|---|---|---|
* * * | new user | get help on commands | know how to use the commands and their parameters |
* * * | user | add a new contact | record one person's phone number and email address |
* * * | user | delete a contact | remove a contact (by name) that I do not need |
* * * | user | view all contacts | easily see and know what contacts are currently stored in the application in one place |
* * | user | find a contact | easily find contacts which names match one of the specified keywords. |
* * | user | add a note to a contact | record additional information about that contact as a note |
* * | user | delete a note from a contact | remove additional information about that contact that are no longer relevant |
* * | user who has some event to do | add an event | record an event with start time and also end time, location and any additional information like what to do during the event |
* * | user who has/had some event to do | delete an event | remove an event after it is obsolete, cancelled or no longer needed to be recorded |
* * | user who has some event to do | filter events | easily see and know which events are within a specified time interval |
* * | tidy user | tag a contact with a label | keep my contacts oraganised and categorised |
* * | tidy user | delete tags from a contact | remove tags that are no longer relevant |
* * | tidy user | filter contacts based on tags | easily see and know which contacts contain one of the specified tags |
* * | user | clear all data | remove all unused data and start managing a new contact list |
* * * | user who finishes using the application | exit the program | exit the program normally while ensuring all my data is currectly saved |
Use Cases
(For all use cases below, the System is the KeepInTouch and the Actor is the user, unless specified otherwise)
Use case: UC01 - Get help on commands
MSS
User requests for help.
KeepInTouch returns relevant documentation.
Use case ends.
Extensions
1a. User inputs with no extra argument.
1a1. KeepInTouch shows a list of all command words.
Use case ends.
1b. User inputs with an extra argument corresponding to a command.
1b1. Extra argument is a command word.
KeepInTouch returns documentation on that command word.
Use case ends.
1b2. Extra argument is not a command word, but is quite similar to a command.
KeepInTouch suggests the command word with the highest degree of similarity to the command input.
Use case resumes at step 1.
1b3. Extra argument is not a command word, and isn't recognizably close to a command word.
KeepInTouch lets the user know that the command is unrecognizable.
Use case resumes at step 1.
Use case: UC02 - Add a new contact
MSS
User requests to add a new contact.
KeepInTouch adds the contact to the list.
KeepInTouch shows the updated list of contacts.
Use case ends.
Extensions
1a. User inputs incomplete or invalid data.
1a1. KeepInTouch shows a message indicating incomplete or invalid data.
Use case resumes at step 1.
Use case: UC03 - Delete a contact
MSS
User requests to delete a contact.
KeepInTouch deletes the contact.
Use case ends.
Extensions
1a. User inputs a contact that does not exist.
1a1. KeepInTouch shows a message indicating that the contact cannot be found.
Use case resumes at step 1.
Use case: UC04 - View all contacts
MSS
User requests to view all contacts.
KeepInTouch shows all contacts.
Use case ends.
Use case: UC05 - Find a contact
MSS
User requests to find contacts which name matches one of the specified keywords.
KeepInTouch shows contacts with matching names.
Use case ends.
Use case: UC06 - Add a note to a contact
MSS
User requests to add a note to a contact.
KeepInTouch adds a note to the contact.
Use case ends.
Extensions
1a. User inputs incomplete data.
1a1. KeepInTouch shows a message indicating incomplete data.
Use case resumes at step 1.
1b. User inputs a contact that does not exist.
1b1. KeepInTouch shows a message indicating that the contact cannot be found.
Use case resumes at step 1.
Use case: UC07 - Delete a note from a contact
MSS
User requests to delete an existing note from a contact.
KeepInTouch deletes the specified note from the contact.
Use case ends.
Extensions
1a. User inputs incomplete data.
1a1. KeepInTouch shows a message indicating incomplete data.
Use case resumes at step 1.
1b. User inputs a contact that does not exist.
1b1. KeepInTouch shows a message indicating that the contact cannot be found.
Use case resumes at step 1.
1c. User inputs a note that does not exist.
1c1. KeepInTouch shows a message indicating that the note cannot be found.
Use case resumes at step 1.
Use case: UC08 - Add an event
MSS
User requests to add an event.
KeepInTouch adds the event.
Use case ends.
Extensions
1a. User inputs incomplete data.
1a1. KeepInTouch shows a message indicating incomplete data.
Use case resumes at step 1.
Use case: UC09 - Delete an event
MSS
User requests to delete an event.
KeepInTouch deletes the event.
Use case ends.
Extensions
1a. User inputs incomplete data.
1a1. KeepInTouch shows a message indicating incomplete data.
Use case reusmes at step 1.
1b. User inputs an event that does not exist.
1b1. KeepInTouch shows a message indicating that the event cannot be found.
Use case resumes at step 1.
Use case: UC10 - Filter events
MSS
User requests to find events within a specified time interval.
KeepInTouch shows the events within the specified time interval.
Use case ends.
Extensions
1a. User inputs incomplete or invalid data.
1a1. KeepInTouch shows a message indicating incomplete or invalid data.
Use case resumes at step 1.
Use case: UC10 - Adding tags to a contact
MSS
User requests to add tags to a contact.
KeepInTouch appends that tags to the specified contact.
Use case ends.
Extensions
1a. User inputs incomplete data.
1a1. KeepInTouch shows a message indicating incomplete data.
Use case resumes at step 1.
1b. User inputs a non-alphanumeric tag.
1b1. KeepInTouch shows a message indicating that tags should be alphanumeric.
Use case resumes at step 1.
1c. User inputs a contact that does not exist.
1c1. KeepInTouch shows a message indicating that the contact cannot be found.
Use case resumes at step 1.
Use case: UC12 - Delete tags from a contact
MSS
User requests to delete tags from a contact.
KeepInTouch deletes the tags from the specified contact.
Use case ends.
Extensions
1a. User inputs incomplete data.
1a1. KeepInTouch shows a message indicating incomplete data.
Use case resumes at step 1.
1b. User inputs a non-alphanumeric tag.
1b1. KeepInTouch shows a message indicating that tags should be alphanumeric.
Use case resumes at step 1.
1c. User inputs a contact that does not exist.
1c1. KeepInTouch shows a message indicating that the contact cannot be found.
Use case resumes at step 1.
Use case: UC13 - Filter contacts based on tags
MSS
User requests to find contacts with one of the specified tags.
KeepInTouch shows the filtered contacts.
Use case ends.
Use case: UC14 - Clear all data
MSS
User requests to remove all unused data.
KeepInTouch clears all the data.
Use case ends.
Use case: UC15 - Exit the program
MSS
User requests to exit the program.
KeepInTouch exits the program.
Use case ends.
Non-Functional Requirements
- Should work on any mainstream OS as long as it has Java
11or above installed. - Should be able to hold up to 10000 contacts without a noticeable sluggishness in performance for typical usage.
- All commands should be executed within two seconds.
- Should be offered as a free application.
- Should work without requiring any installer.
- Should work without requiring any internet connection.
- A user with above average typing speed for regular English text (i.e. not code, not system admin commands) should be able to accomplish most of the tasks faster using commands than using the mouse.
- The GUI should work well for standard screen resolutions 1920x1080 and higher, and, for screen scales 100% and 125%.
- The GUI should be intuitive and user-friendly.
- Should not require user to have prior technical knowledge.
Glossary
- Mainstream OS: Windows, Linux, Unix, OS-X
Appendix B: Instructions for manual testing
Given below are instructions to test the app manually.
Note: These instructions only provide a starting point for testers to work on; testers are expected to do more exploratory testing.
Launch and shutdown
Initial launch
Download the jar file and copy into an empty folder
Double-click the jar file Expected: Shows the GUI with a set of sample contacts. The window size may not be optimum.
Saving window preferences
Resize the window to an optimum size. Move the window to a different location. Close the window.
Re-launch the app by double-clicking the jar file. Expected: The most recent window size and location is retained.
Exiting
- Use the
exitcommand to close the app. Expected: app closes without error.
- Use the
Deleting a person
Deleting a contact while all contacts are being shown
Prerequisites: List all contacts using the
list contactcommand. Multiple contacts will be shown in the list.Test case:
delete contact 1
Expected: First contact is deleted from the list. Details of the deleted contact shown in the status message.Test case:
delete contact 0
Expected: No contact is deleted. Error details shown in the status message.Other incorrect delete contact commands to try:
delete contact,delete contact x,...(where x is larger than the list size)
Expected: Similar to previous.
Deleting a contact while event list is showing
Prerequisites: List all contacts using the
listcommand. Multiple contacts in the list. Add events to the first contact in the index and remove all event from the second contact in the index.Test case:
delete contact 1
Expected: First contact is deleted from the list. Details of the deleted contact shown in the status message. All events related to the first contact should be deleted from the event list as well
Adding tag
Adding tag while all contacts is shown.
Prerequisites: List all contacts using the
list contactcommand. At least one contact shown in the list.Test case:
add tag -id 1 -t Frontend -t Java
Expected: The new tags appear below the name of the first contact in the list. The list of tags added is shown in the status message.Test case:
add tag -id 0 -t Frontend
Expected: No tag is added. Error details shown in the status message.Test case:
add tag -id 1 -t HR representative
Expected: No tag is added as tag name should not contain spaces. Error details shown in the status message.
Adding duplicate tag to a contact
Prerequisites: List all contacts using the
list contactcommand. At least one contact shown in the list has at least one tag.Test case:
add tag -id 1 -t x, where x is an already existing tag in the first contact.
Expected: The new tag appear below the name of the first contact in the list. The list of tags added is shown in the status message.Test case:
add tag -id -t Frontend -t Frontend
Expected: Only oneFrontendtag is added below the name of the first contact. Only oneFrontendtag is shown in the list of tags added in the status message.
Adding tag while contact list is being filtered
Prerequisites: Filter the list of contacts either by calling
list contact -t [SOME_TAG]orfind [SOME KEYWORD].Test case:
add tag -id 1 -t Frontend, when no contact is shown
Expected: No tag is added. Error details shown in the status message.Test case:
add tag -id 1 -t Frontend, when at least 1 contact is shown
Expected: The new tags appear below the name of the first contact in the filtered list. The list of tags added is shown in the status message. List will go back to showing all contacts.
Deleting tag
Deleting tag while all contacts is shown and tag exists.
Prerequisites: List all contacts using the
list contactcommand. At least one contact shown in the list has at least one tag.Test case:
delete tag -id 1 -t x, where x is an existing tag in the first contact.
Expected: The tag x is no longer below the name of the first contact in the list. The list of tags deleted is shown in the status message.Test case:
delete tag -id 0 -t Frontend
Expected: No tag is deleted. Error details shown in the status message.Test case:
delete tag -id 1 -t HR representative
Expected: No tag deleted as tag name should not contain spaces. Error details shown in the status message.
Deleting tag while all contacts is shown but tag does not exist.
Prerequisites: List all contacts using the
list contactcommand. At least one contact is shown in the list.Test case:
delete tag -id 1 -t x, wherexis a non-existing tag in the first contact.
Expected: No tags is deleted. The list of tags deleted shown in the status message is empty while the list of tags not found containsx.
Deleting tag while contact list is being filtered
Prerequisites: Filter the list of contacts either by calling
list contact -t [SOME_TAG]orfind [SOME KEYWORD].Test case:
delete tag -id 1 -t Frontend, when no contact is shown
Expected: No tag is deleted. Error details shown in the status message.Test case:
delete tag -id 1 -t x, when at least 1 contact is shown andxis an existing tag in the first contact.
Expected: The tagxis no longer below the name of the first contact in the list. The list of tags deleted shown in the status message is empty while the list of tags not found containsx. List will go back to showing all contacts.Test case:
delete tag -id 1 -t x, when at least 1 contact is shown andxis a non-existing tag in the first contact.
Expected: The tagxis no longer below the name of the first contact in the list. The list of tags deleted is shown in the status message. List will go back to showing all contacts.
Adding note
Adding note while all contacts is shown.
Prerequisites: List all contacts using the
list contactcommand. At least one contact shown in the list.Test case:
add note -id 1 -tit Meeting Topics -con The topic is about the framework design of the project
Expected: The new note appears in the Notes column of the contact. The note added is shown in the status message.Test case:
add note -id 0 -tit Meeting Topics -con The topic is about the framework design of the project
Expected: No note is added. Error details shown in the status message.Test case:
add note -id 1 -tit Meeting Topics
Expected: No note is added as a note should have a note content. Error details shown in the status message.
Adding another note to a contact
Prerequisites: List all contacts using the
list contactcommand. At least one contact shown in the list has at least one note.Test case:
add note -id 1 -tit Open Position -con Applications for SWE full-time positions will open soon, where x is an already existing tag in the first contact.
Expected: The new note appears in the Notes column of the contact. The note added is shown in the status message.
Adding note while contact list is being filtered
Prerequisites: Filter the list of contacts by calling
find KEYWORD [OTHER_KEYWORDS...].Test case:
add note -id 1 -tit Meeting Topics -con The topic is about the framework design of the project, when no contact is shown
Expected: No note is added. Error details shown in the status message.Test case:
add note -id 1 -tit Meeting Topics -con The topic is about the framework design of the project, when at least 1 contact is shown
Expected: The new note appears in the Notes column of the contact. The note added is shown in the status message.
Deleting note
Deleting note while all contacts is shown and note exists.
Prerequisites: List all contacts using the
list contactcommand. At least one contact shown in the list has at least one note.Test case:
delete note -id 1 -nid 0
Expected: No note is deleted as note id is invalid. Error details shown in the status message.Test case:
delete note -id 1 -nid 1
Expected: The note deleted is no longer shown in the first contact in the list. The note deleted is shown in the status message.
Deleting note while all contacts is shown but note does not exist.
Prerequisites: List all contacts using the
list contactcommand. At least one contact is shown in the list.Test case:
delete note -id 1 -nid 100, where the number of notes in the first contact is less than 100.
Expected: No note is deleted. Error details shown in the status message.
Deleting note while contact list is being filtered
Prerequisites: Filter the list of contacts by calling
find KEYWORD [OTHER_KEYWORDS...].Test case:
delete note -id 1 -nid 1, when no contact is shown.
Expected: No note is deleted. Error details shown in the status message.Test case:
delete note -id 1 -nid 1, when at least 1 contact is shown but has no notes.
Expected: No note is deleted. Error details shown in the status message.Test case:
delete note -id 1 -nid 1, when at least 1 contact is shown has at least 1 note.
Expected: The note deleted is no longer shown in the first contact in the list. The note deleted is shown in the status message.
Adding event
Adding event while all contacts are shown.
Prerequisites: List all contacts using the
list contactcommand. At least one contact shown in the list and there will be an events column for each contact. Use thelist eventscommand to open a new window with a list of all events without the respective contacts.Test case:
add event -id 1 -en Meeting with professor -st 2024-11-17 12:00:00 -et 2024-11-17 13:00:00 -loc COM 1 Basement -info Discuss the project
Expected: The new event will appear in the first contact's event column. It will also be added in the event list window. The title of the event added is shown in the status message.Test case:
add event -id 1 -en Meeting with professor -st 12:00:00 -et 13:00:00 -loc COM 1 Basement -info Discuss the project
Expected: Similar to previous test, but date will automatically be current date.Test case:
add event -id 1 -en Meeting with professor -st 2024-11-17 -et 2024-11-18 -loc COM 1 Basement -info Discuss the project
Expected: Similar to previous test, but time will automatically be00:00:00.Test case:
add event -id 0 -en Chat with recruiter -st 2024-11-24 17:00:00 -et 2024-11-24 18:00:00 -loc Star Vista -info Discuss job opportunities
Expected: No event is added. Error details shown in the status message.Test case:
add event -id 1 -en Chat with recruiter -st 2024/11/24 17:00:00 -et 2024/11/24 18:00:00 -loc Star Vista -info Discuss job opportunities
Expected: No event is added as date and time is not in the correct format. Error details shown in the status message.
Adding duplicate or clashing events
Prerequisites: Use the
list eventscommand to open a new window with a list of all events without the respective contacts.Test case:
add event -id 1 ..., where...is an already existing event in the event list.
Expected: No event is added. Error details shown in the status message.Test case:
add event -id 1 ... -st xwherexis in between the start and end time of an event currently on the list.
Expected: No event is added. Error details shown in the status message.
Adding event while contact list is being filtered
Prerequisites: Filter the list of contacts either by calling
list contact -t [SOME_TAG]orfind [SOME KEYWORD]. Use thelist eventscommand to open a new window with a list of all events without the respective contacts.Test case:
add event -id 1 ..., when no contact is shown
Expected: No event is added. Error details shown in the status message.Test case:
add event -id 1 ..., when at least 1 contact is shown
Expected: The new event will appear in the first contact's (in the filtered list) event column. It will also be added in the event list window. The title of the event added is shown in the status message.
Listing events
Listing events without using filters
Prerequisites: There are at least 2 events in the address book
Test case:
list events
Expected: All events in the address book are shown in the status message and a new "Event List" window, sorted by start time in ascending order.Test case:
list events -descending
Expected: All events in the address book are shown in the status message and a new "Event List" window, sorted by start time in descending order.Test case:
list events -descending xxx
Expected: Error message about the wrong command format is shown in the status message.
Listing events with filters:
Prerequisites: There are at least 2 events in the address book
Test case:
list events -st 2023-11-14 00:00 -et 2023-11-20 00:00
Expected: Only the events that the start time is within2023-11-14 00:00:00and2023-11-20 00:00:00are shown in the status message and a new "Event List" window, sorted by start time in ascending order.Test case:
list events -st 2023-11-14 00:00 -et 2023-11-20 00:00 -descending
Expected: Only the events that the start time is within2023-11-14 00:00:00and2023-11-20 00:00:00are shown in the status message and a new "Event List" window, sorted by start time in descending order.Test case:
list events -st 2023-11-14 00:00
Expected: Error message about the wrong command format is shown in the status message.Test case:
list events -et 2023-11-14 00:00
Expected: Error message about the wrong command format is shown in the status message.
Deleting event
Deleting an event while all events are being shown
Prerequisites: List all contacts and events using the
list contactcommand. This will show every contact and its respective events. Use thelist eventscommand to open a new events window showing all events (without the contacts).Test case:
delete event -id 2 -eid 1
Expected: First event of the second contact is deleted. Title of the deleted event shown in the status message. Event deleted from the list in the events window.Test case:
delete event -id 0 -eid 1
Expected: No event is deleted. Error details (contact not found) shown in the status message.Test case:
delete event -id 1 -eid 0
Expected: No event is deleted. Error details (event not found) shown in the status message.Other incorrect delete commands to try:
delete event,delete event -id x -eid 1,delete event -id 1 -eid x,...(where x is larger than the size of contacts/events)
Expected: Similar to previous test cases.
Deleting event while contact list is being filtered
Prerequisites: Filter the list of contacts either by calling
list contact -t [SOME_TAG]orfind [SOME KEYWORD]. Use thelist eventscommand to open a new events window showing all events (without the contacts).Test case:
delete event -id 1 -eid 1, when no contact is shown
Expected: No event is deleted. Error details shown in the status message.Test case:
delete event -id 1 -eid 1, when at least 1 contact is shown and there is at least 1 event in the first contact.
Expected: The event will no longer be shown in the first contact of the filtered list. It will also be removed from the events list window. List will go back to showing all contacts.Test case:
delete event -id 1 -eid 1, when at least 1 contact is shown and there are no events in the first contact.
Expected: No event is deleted. Error details shown in the status message.
Appendix C: Planned Enhancements
This section describes some enhancement that can be made to the existing app.
User Interface
- In the current version, long names (usually longer than 40 characters) are truncated in the interface. Wrapping of names can be implemented so that long names are displayed in a more readable and user-friendly manner.
- The highlight of the contact entries is gray in color and the color of the text is white. The low contrast of the two colors decreases the readability of the texts. The color of the highlight can be changed to a darker color.
- The viewing the list of events using the
list eventscommand, the details of the contact which the event belongs to, is not present. This is incovenient for users as they will have to look through the contact list manually to find the contact. Future updates can append the contact details together with the event details when listing events.